Posted:

Over the past few months I’ve had a number of requests from the ReadyNAS forum & elsewhere for info on how I implement my Aperture Workflow with a ReadyNAS device. This is a short overview of how I work.
I use Aperture primarily on my iMac that sits in the same room as my Ultra-4 and NV+ NAS, wired to the same GbE Switch, but also on my MacBook when travelling. I have adopted a Referenced Library approach that maximizes my Aperture performance while enabling me to store images on the NAS that can then be accessed by other applications, as follows:
Edit: I have completed some new performance testing of hosting Aperture Libraries directly on a ReadyNAS via AFP. See end of the post for an update
iMac Workflow
The Aperture Library itself is hosted on the local HDD of the iMac - this ensures the fastest performance when importing and editing photos.
In general, the workflow I use is as follows:
» Import Images » Coarse Image Management » Relocate Masters to NAS » Backup Library » Photo Editing`
Import Images:
When importing images, I import them directly into my library - ie at this point I am working with a Managed Library for those new images. I do this as it is the simplest, fastest option giving me direct access to all photos on my local disk. I don’t wish to worry about where the photos are or referencing files at this stage - I’m more interested in the images themselves and getting them from my camera(s).

In Aperture 3 there is a new “Backup” option in the Import panel - this option allows you to make a copy of all the imported images to a secondary location immediately upon import. I have that permanently set to point at a backup folder on my NAS with a preset to create a simple folder structure based on photo date. (See opposite) This way, even though I’m working with a “managed” library at this point for the newly imported images, I maintain a second copy of those imported images on my ReadyNAS should I screw up the import or subsequent steps and can clear my memory card(s).
Coarse Library Management:
At this point I have a new project within Aperture with a dump of newly imported photos - some good, some not so good - but all already backed up to my NAS. So it’s time to do some basic photo management: Reject the clearly bad images I really don’t want; organize the remaining images into separate projects and/or albums; perhaps even a little processing on some key images that catch my eye (eg exposure & color correction), geotagging, adding a few comments and tags that immediately come to mind.
The net result of this step is that I have all the photos organized, and ready for more detailed processing / rating / tagging etc. But first…
Relocate Masters:

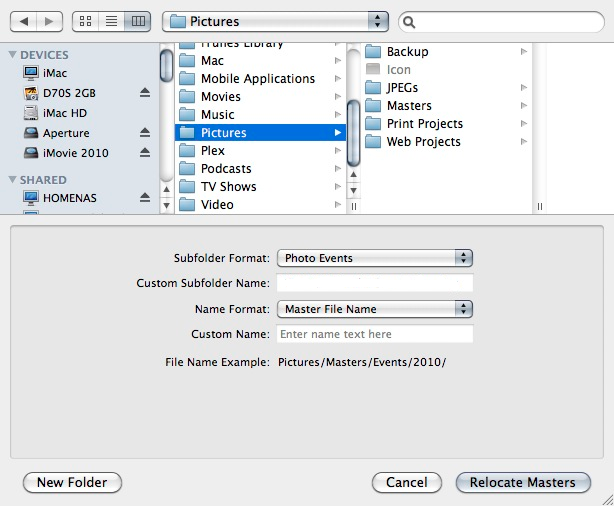
This is the point where I move these newly imported images to be part of my Referenced setup by storing them on my ReadyNAS rather than within the Aperture Library. Simply by selecting the projects, I can go to the menu File » Relocate Masters… and this enables me to move the master images directly to my NAS.
In the dialog that appears (See opposite) you can specify a custom subfolder format for storing these images - by making a custom preset and using that, I can select a master folder (that Aperture always defaults to) and organize my images in appropriate subfolders. I don’t have to play about specifying anything else.
In my case subfolders are always based on the Aperture Project name & date the photos were taken.
So relocating the image masters becomes:
- Select Projects
- Go to: File » Relocate Masters… (See Dialog Opposite)
- Aperture dialog always opens to the same master folder
- I double check that the correct preset is selected
- Press the “Relocate Masters” Button
Backup Library
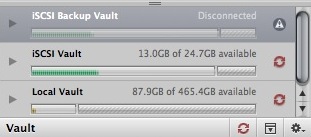
 At this point I now have all my photos on the NAS, in a simple folder structure where I can access them for backup or from other applications and I have a secondary copy elsewhere on the NAS made at import. All that remains is to backup the library from the local HDD, which is a one click process to update my Vault(s) setup in Aperture and also stored on the NAS, while overnight both the Vaults and master images are automatically backed up to my backup NAS (NV+) as well as to my offsite Crashplan account.
Summary
With backups complete, and photos on the NAS I can now continue with the more valuable process of actually working with the photos.
Comparing the above to a fully managed library flow - it really just consists of one extra step (Relocate Masters) that, once setup, requires only couple of mouse clicks and a brief wait while photos are archived to the NAS. But it adds significant benefit in being able to leverage my NAS for both backing up and sharing those photos with others and other applications

MacBook Flow
The iMac flow works fine when I’m at home, but when traveling I have Aperture installed on my MacBook so that I can load images from my camera to the MacBook for backup. In this instance, as I have no NAS available, I find it easiest to work with a completely Managed Library flow.
In the first instance I perform the same 2 initial steps as per my iMac flow - Import & Coarse Library Management. I still create a backup during import, but to a USB drive simply as a precaution. I also make a vault backup to the same USB drive, again as a precaution. (I have a pocket sized HFS+ formatted 500GB USB drive that serves well for this)
When I get home, I use the Drag & Drop capability of Aperture to export the new projects from my Macbook to the iMac as follows:
- Drag the new Projects from Aperture, to the Desktop of my Macbook (or to a ReadyNAS Share). This creates a new library containing only the new photos, including the master images and any edits/changes I may have made
- From my iMac, I connect to the MacBook/ReadyNAS and drag the newly created library into my iMac library. This gives the option to merge that library into the existing one.
- At this point I have done the equivalent of the first 2 steps of the iMac flow (Import & Coarse Management) and so can relocate the master images as before and continue with my iMac flow
Conversely, if there are images in my iMac library that I wish to take with me on the MacBook, I can reverse the above steps. When dragging a project from a Referenced library, Aperture will ask if you want to consolidate the images also; I use that so that the macbook gets a complete copy of library and masters - it’s far easier than trying to deal with a referenced library on the MacBook which offers no real advantages
Summary
Overall I find Aperture’s ability to work with Referenced Images to be very powerful and very easy to use, but it is not always the best option as described for my MacBook based library. Also, the ability to drag & drop projects into and out of Aperture may often be overlooked but makes a multi-host work flow like mine extremely simple in practice, without the need for complex ‘synchronisation’ of libraries.
Update
13 Nov: Aperture Performance with Network Hosted (AFP) Library
I am involved in some new performance testing related to using Apple applications with data and libraries hosted via AFP on a ReadyNAS device. This testing has shown a significant improvement when hosting Aperture Libraries on the ReadyNAS.
With Aperture 3.1, OSX 10.6.5 and RAIDiator Firmware 4.2.15, accessing Aperture Libraries from an AFP Volume is significantly faster than I have previously experienced - with smooth scrolling and a very responsive interface. There is some lag when rendering images, but the responsiveness of the interface makes this very tolerable. Exporting of projects to the NAS and the creation & use of Vaults performs acceptably also. (Note: my previous testing was only with Aperture 2 so the new library format used in Aperture 3 may also played a part in the improvement)
Overall, while hosting a full Library on the NAS is certainly slower that hosting as I describe in this post, it is very much a usable setup and makes sharing Libraries between clients via the ReadyNAS a valid option.
Comments