Posted:
With newer OS’es like Windows 7 and OSX Snow Leopard, the “Share” security mode featured on some older ReadyNAS devices like the NV+ is unfortunately no longer supported. The solution to the problems this causes is to migrate the ReadyNAS to “User” security mode. In “User” mode, individual user accounts are created on the NAS for each person that will access it. That user account is then granted appropriate access to shares, rather than the shares themselves being password protected. To migrate to “User” mode, 3 major steps are required:
- Change Mode
- Create a User for you to access the NAS
- Fix permissions so that new user account has full access to the data, as before.
Afterwards you may wish to take an additional step 4) to create other user accounts and give them permissions that may be the same or different from your own user account. These are the accounts your friends, colleagues, family would use
Detailed Process
Step 1) Load Frontview and then go to Security → Security Mode in the left menu.
This should present you with a window that has 3 major options for the Security mode:
- Share
- User
- Domain
You should change the option from Share to User, and if necessary complete the “workgroup” option, keeping it the same as you had in share mode. Then press the Apply button (bottom right)
Step 2) Go to the Frontview menu Security → Users & Group Accounts.
This will load a window where you can add your new user account. Select the “Add User” tab and add one account entering a username of your choice (eg “john”), your email address, and a password, leaving the other options alone. There are no restrictions on the characters you can use in the password or the length, but note that you cannot create a user with the same name as an existing share. And then again apply your changes with the button in the bottom right.
Step 3) Reset Permissions in Shares → Share Listing → Protocol → Advanced Options
Note: This step is critical to ensuring you continue to have access to data already stored on the ReadyNAS
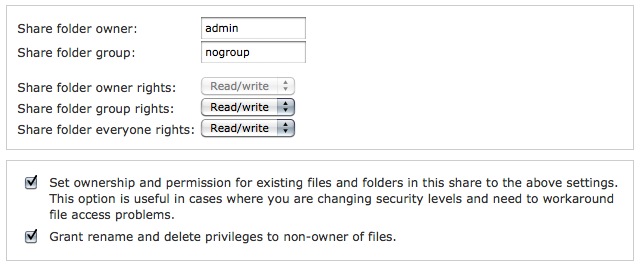
Because of the mode change, the permissions on your files are likely to be in appropriate and could give you access issues. To pre-empt this, in Frontview go to Shares → Share Listing and select the protocol icon for your first share (eg AFP or CIFS) When the protocol options window has loaded, to the right is a tab called “Advanced Options”. Select that and in the new tab, change the options so that they look exactly as in the following image and then press apply

You need to repeat the above for each of your shares. Once done - you should be set to reconnect your computer to the ReadyNAS device and have full access to your shares. Afterwards you may wish to have a look at this post for the Step 4 mentioned at the beginning - it is a good overview of how to setup permissions for multiple users (should you need to)
NOTE: This is a first draft of how to make this migration and therefore there may be errors or points that are not fully explained. Feedback would be appreciated so the guide may be improved
Comments