Posted:
With the release of Final Cut Pro X, Apple has removed the ability to directly and easily work with video clips & projects stored on traditional AFP, CIFS or NFS accessible network volumes, now only supporting XSAN based network storage.
It is however still possible to archive video and projects to ReadyNAS devices by following a few additional steps
Background

For the past 2 years I have primarily used Final Cut Express - the baby brother to Apple’s professional Final Cut Pro video editing suite - as my video editor of preference and in particular taken advantage of the ability to locate the “Scratch Disk” on my ReadyNAS. While this feature makes it possible to work directly with video data stored on my NAS, my primary aim has been to enable easy archiving of video projects to my NAS but still have them readily accessible.
With the release of Final Cut Pro X (FCPX), which replaces both Final Cut Pro and Final Cut Express, this concept of a “Scratch Disk” has been removed. Instead, like with many of Apple applications, FCPX now requires that projects and video clips be stored in specific locations and only on HFS+ formatted volumes. While Apple does support XSAN - a fibre channel based Storage Area Network technology - this is hardly an option for most home users and the HFS+ requirement ensures storing project data on AFP or CIFS mounted network volumes is no longer directly supported. (Note: video clips located on network volumes can still be referenced when imported - see later).
FCPX does fully support the use of disk images and with the built in project duplication capabilities of FCPX this proves to be a useful alternative way to maintain accessible project archives
Archiving Projects
1) Create a disk image
Open Disk Utility, select “New Image” from the tool bar and create an appropriate image - for example:

Here I’m creating 10 GB capacity image as a sparsebundle to minimise actual disk usage. The key requirement is that the format of the image must be “Mac OS Extended (Journaled)”.

2) Store the image on a ReadyNAS volume & mount
Copy the disk image created in step 1 to your NAS, double-click to mount and the image should appear in FCPX as follows:
3) Duplicate a project, targeting the mounted disk image as the destination
Select the project you wish to archive within FCPX, and either drag to the mounted Disk Image, or press CMD+D to open the “Duplicate” dialog box, selecting the Disk Image as the destination:

Finally, select the appropriate options regarding what data should be archived and press “OK” to confirm the duplication.
The net result is you now how a full Project Archive, stored on your ReadyNAS that can be re-mounted to provide direct access to that project from your ReadyNAS.
A Note on Working with Video Clips stored on your ReadyNAS
Using video clips stored on a NAS couldn’t be easier in FCPX. When importing video files, the following option is available:
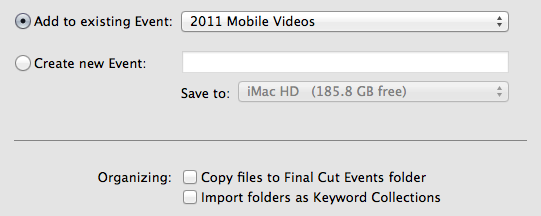
If you do not select the “Copy files to Final Cut Events folder” option, FCPX will instead create aliases to your original media including to that stored on standard network volumes
Comments