Posted:
SSL Warnings
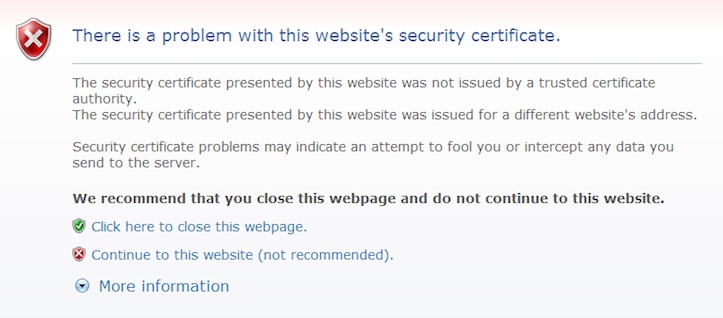
How often have you seen a warning like this?
Or this:
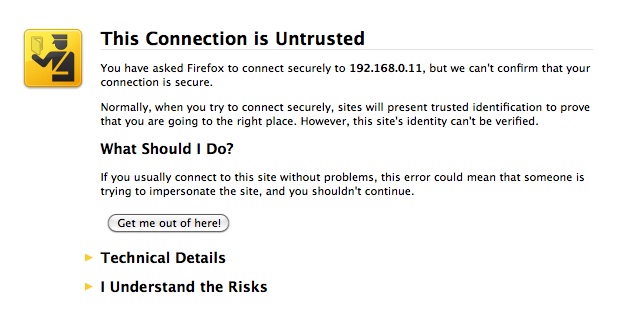
More importantly, how often do other users of your NAS see such warnings? And do they know what to do to avoid them, or understand that they are not some kind of fatal error and that your website or NAS access is working just fine?
An SSL certificate is a means by which web servers prove their identity to web browsers and is digitally “signed” by a certificate authority, such as Verisign, that web browsers already trust. This allows your web browser to verify you are talking to your NAS and not some other server pretending to be your NAS, and then enables encrypted data transfers. The above warnings occur when you do not have a certificate that has been signed by a 3rd party Certificate Authority.
In addition to Certificate authorits like Verisign, many ISPs and Domain Registrars offer their customers cheap SSL certificates. If you have such a certificate, or buy one, unfortunately Netgear has yet to see fit to provide a mechanism for installing it (unlike their competition), so getting rid of the confusing warning message for your users and ensuring secure communication to your NAS.
The following is the manual process to install that certificate on your ReadyNAS devices
Note: This process assumes you have sufficient knowledge to SSH into your NAS as the root user and to work at the linux command line. If you you don’t, or you don’t understand what this means - stop now. The process also assumes that you also have a domain name assigned to your NAS - if you don’t then you cannot obtain an SSL certificate.
The Certificate:
Providing details of how to obtain a certificate and from where is beyond the scope of this post as the process can vary significantly from provider to provider. I obtained my Certificate via my Domain Registrar who have a co-operation with Alpha SSL. Alpha SSL has a very clear & simple process for creating the Certificate Signing Request (CSR) that is required for them to issue the certificate. You can find details here: https://www.alphassl.com/support
When you purchase your certificate, you should receive up to 4 “items” of data from the Certificate Authority. I use the term “items” as these may be provided as 1, 2, 3 or 4 separate files. The items are:
- Global Certificate Authority Root Certificate
- An Intermediate Certificate
- Your Personal Public Certificate
- Your Private Key Certificate
Note that item 2 is optional depending on the issuing authority.
Installing the certificate
This can only be done by remotely logging into your NAS as root via SSH - so log in, and follow these steps:
Step 1. Copy the Global Certificate Authority Root Certificate to text file called: /etc/frontview/apache/addons/gs_root.pem
Step 2. If provided, copy the intermediate certificate to a text file called: /etc/frontview/apache/addons/intermediate.pem
Step 3. Create a single text file that contains both your Prvate Key Certificate and your Personal Public Certificate appended immediately after it - copy this file to your NAS as /etc/frontview/apache/apache.pem
Note that in this last step you will have to overwrite an existing file which is the current certificate and which therefore causes the warnings we are trying to fix. It is safe to overwrite as it can easily be regenerated in frontview if needed. I would however recommend that once copied, this new apache.pem file be made immutable so that it will not be overwritten by a firmware upgrade or reinstall or accidentally via Frontview.
chattr +i /etc/frontview/apache/apache.pem
Note also that there are other ways to setup the certificate that do not require the merging of your Public and Private certificates, but using those will break FTPS access to your NAS should you use that as it assumes the 2 will be available as one file and it is preferable to not have to modify the FTP server configuration.
Step 4. Create a file /etc/frontview/apache/addons/ssl.conf with the following contents:
SSLCACertificateFile /etc/frontview/apache/addons/gs_root.pem
SSLCertificateChainFile /etc/frontview/apache/addons/intermediate.pem
Step 5. Restart the Apache web server with the command killall -HUP apache-ssl
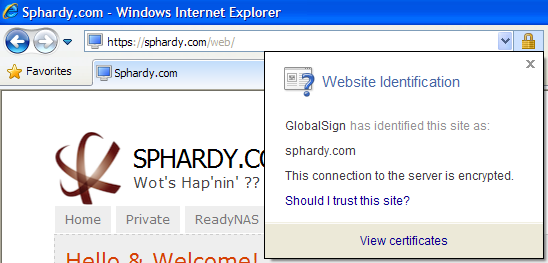
If all has gone well, you should now be able to connect to your NAS over HTTPS (using the certified domain name) without warning. You should also see that the certificate is in use such as in the following example:
This installation should survive a firmware update or reinstallation as it does not require you to modify any critical firmware configuration files.
Finally, you should see that this post is delivered over SSL without generating warnings
Internet Explorer 8

Firefox 3.6

Comments